Optimization🔗
Restricting the search region🔗
The obvious way to restrict the search space is to apply the operator find_generic_shape_model not to the whole image but only to an ROI.
Figure 1 shows such an example.
The reduction of the search space can be realized in a few lines of code.
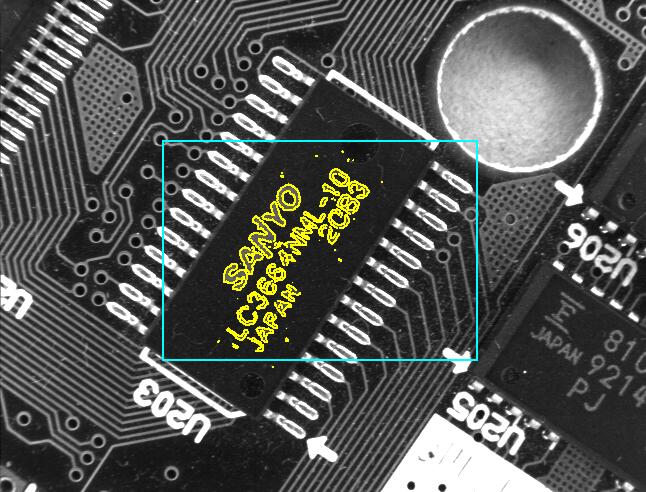
Step 1: Create a region of interest
First, you create a region, for example, with the operator gen_rectangle1.
Row1 := 141
Column1 := 159
Row2 := 360
Column2 := 477
gen_rectangle1 (SearchROI, Row1, Column1, Row2, Column2)
Step 2: Restrict the search to the region of interest
Then, each search image is reduced to this ROI using the operator reduce_domain.
In this example, the search speed is almost doubled using this method.
for i := 1 to 20 by 1
read_image (SearchImage, 'board/board-' + i$'02')
reduce_domain (SearchImage, SearchROI, SearchImageROI)
find_generic_shape_model (SearchImageROI, ModelID, MatchResultID, NumMatchResult)
endfor
Note that by restricting the search to an ROI you actually restrict the position of the point of reference of the model, i.e., the center of gravity of the model ROI.
This means that the size of the search ROI corresponds to the extent of the allowed movement.
For example, if your object can move ± 10 pixels vertically and ± 15 pixels horizontally you can restrict the search to an ROI of the size 20×30.
In order to assure a correct boundary treatment on higher pyramid levels, we recommend to enlarge the ROI by \(2^{NumLevels-1}\) pixels in each direction.
Thus, if you specified NumLevels = 4, you can restrict the search to an ROI of the size 36×46.
Important
Please note that even if you modified the point of reference (for example, using set_shape_model_origin or set_generic_shape_model_param although this is not recommended), the original one, that is, the center point of the model ROI, is used during the search.
Thus, you must always specify the search ROI relative to the original point of reference.
Searching for multiple models simultaneously🔗
If you are searching for instances of multiple models in a single image, you can of course call the operator find_generic_shape_model multiple times.
But a much faster alternative is calling the operator once and passing the different models simultaneously as a tuple to ModelID.
Doing so we would mention the following points:
-
In case of a single model, the resulting match instances contain an entry referring to the identifier of the respective model.
-
To retrieve the result of a specific shape model using
get_generic_shape_model_resultandget_generic_shape_model_result_object, respectively, you can pass its identifier or handle toMatchSelector. See alsoget_generic_shape_model_resultfor more information about theMatchSelector. -
The search is always performed in a single image. However, you can restrict the search to a certain region for each model individually by passing an image array (see below for an example).
-
The search parameters are the ones set for every model.
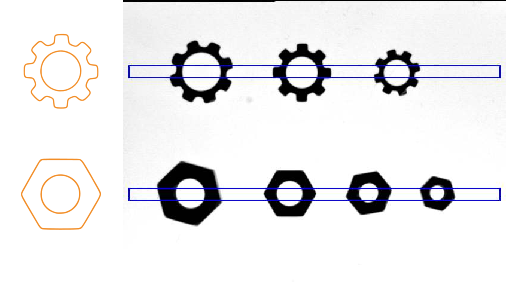
The example HDevelop program %HALCONEXAMPLES%\solution_guide\matching\multiple_models.hdev uses the operator find_generic_shape_model to search simultaneously for the rings and nuts depicted in Figure 2.
Step 1: Create the models
First, two models are created and trained, one for the rings and one for the nuts.
The two model IDs are then concatenated into a tuple using the operator assign.
create_generic_shape_model (ModelIDRing)
set_generic_shape_model_param (ModelIDRing, 'iso_scale_min', 0.8)
set_generic_shape_model_param (ModelIDRing, 'iso_scale_max', 1.2)
train_generic_shape_model (ImageROIRing, ModelIDRing)
create_generic_shape_model (ModelIDNut)
set_generic_shape_model_param (ModelIDNut, 'iso_scale_min', 0.6)
set_generic_shape_model_param (ModelIDNut, 'iso_scale_max', 1.4)
train_generic_shape_model (ImageROINut, ModelIDNut)
ModelIDs := [ModelIDRing,ModelIDNut]
Note how we set different model parameters restricting possible scaling.
Step 2: Specify individual search ROIs
In the example, the rings and nuts appear in non-overlapping parts of the search image. Therefore, it is possible to restrict the search space for each model individually. A search ROI corresponds to the extent of the allowed movement. Thus, narrow horizontal ROIs can be used in the example (see Figure 2).
The two ROIs are concatenated into a region array (tuple) using the operator concat_obj and then “added” to the search image using the operator add_channels, i.e., in each region the corresponding gray values of the search image are “painted”.
The result of this operator is an array of two images, both having the same image matrix.
The domain of the first image is restricted to the first ROI and the domain of the second image is restricted to the second ROI.
gen_rectangle1 (SearchROIRing, 110, 10, 130, Width - 10)
gen_rectangle1 (SearchROINut, 315, 10, 335, Width - 10)
concat_obj (SearchROIRing, SearchROINut, SearchROIs)
add_channels (SearchROIs, SearchImage, SearchImageReduced)
Step 3: Find all instances of the two models
Now, the operator find_generic_shape_model is applied to the created image array.
Note that we can set the search parameters for each model individually.
In this example we access the found instances and their model identifier one by one for illustration purpose, but we could also have accessed them all at once using a different match selector.
find_generic_shape_model (SearchImageReduced, ModelIDs, MatchResultID, NumMatchResult)
for i := 0 to NumMatchResult - 1 by 1
    get_generic_shape_model_result (MatchResultID, i, 'model_identifier', Model)
    get_generic_shape_model_result_object (Objects, MatchResultID, i, 'contours')
    dev_display (Objects)
endfor
Optimizing matching speed🔗
Important
Please note that in order to optimize the matching it is very important to have a set of representative test images from your application in which the object appears in all allowed variations regarding its position, orientation, occlusion, and illumination.
Step 1: Assure that all objects are found
Before tuning the parameters for speed, we recommend to find settings such that the matching succeeds in all test images, i.e., that all object instances are found. If this is not the case when using the default values, check whether one of the following situations applies:
-
Is the search algorithm “too greedy”?
In some cases a perfectly visible object is not found if the'greediness'is too high. Select the value0to force a thorough search. -
Is the object partly occluded?
If the object should be recognized in this state nevertheless, reduce the parameter'min_score'. -
Does the matching fail on the highest pyramid level?
In some cases the minimum score is not reached on the highest pyramid level even though the score on the lowest level is much higher. Test this by reducing'num_levels'. Alternatively, set'pyramid_level_highest'or reduce'min_score'. -
Does the object have a low contrast?
If the object should be recognized in this state nevertheless, reduce the parameter'min_contrast'. -
Is the polarity of the contrast inverted globally or locally?
If the object should be recognized in this state nevertheless, use the appropriate value for the parameter'metric'when creating the model. If only a small part of the object is affected, it may be better to reduce'min_score'instead. -
Does the object overlap another instance of the object?
If the object should be recognized in this state nevertheless, increase the parameter'max_overlap'. -
Are multiple matches found on the same object??
If the object is almost symmetric, restrict the allowed range of rotation or decrease the parameter'max_overlap'.
Step 2: Tune the parameters regarding speed
If all objects are found but the application needs to be sped up, there are some ways to tune it, depending on both the model and the search parameters. Having a look at the runtime of the main parts of the matching pipeline can be a good indicator which steps of the search have significant/relevant speedup potential.
Note
Note that the time measurements will vary between calls, as they are strongly influenced by external factors such as, for example, operating system interrupts or other processes like, for example, antivirus software.
The time measurements can be activated using set_generic_shape_model_param with 'pipeline'.
The result handles of the matching operation can then be queried using get_generic_shape_model_result and show the runtime along the matching pipeline.
If significant time is spent in the top level stage, you could proceed like this:
- Increase
'min_score'as far as possible, i.e., as long as the matching succeeds. - Now, increase
'greediness'until the matching fails. Try reducing'min_score'. If this does not help restore the previous values. - Restrict the allowed range of rotation and scale as far as possible. Alternatively, adjust the corresponding parameters already at model level.
- Restrict the search to a region of interest.
If significant time is spent in the tracking part and one is willing to trade off accuracy and robustness against speed, an approach would be this:
- Terminate the search on a higher pyramid level.
- Restrict the maximally allowed model deformation.
If the subpixel refinement takes a significant time in the matching pipeline, you could proceed like this:
- Switch subpixel refinement to
'interpolation'or even switch it off with'none'to trade off accuracy against speed.
When acquiring your images and creating your model you can already influence the speed of the search significantly by preferring models with dominant structures to models with weak structures.
These additional methods are more “risky”, i.e., the matching may fail if you choose unsuitable parameter values:
- Increase
'min_contrast'as long as the matching succeeds. - If you are searching for a particularly large object, it typically helps to select a higher point reduction with the parameter
'optimization'. - Increase
'angle_step'(and'iso_scale_step'or the corresponding parameters for anisotropic scaling) as long as the matching succeeds.
Visualizing score contribution🔗
By retrieving score visualization contours, you can investigate how different parts of the model are contributing to the matching score. Use cases for score visualization contours:
- Check which model parts are matched well in images, and which model parts do not represent the actual object instances accurately.
- Investigate why certain matches might have received higher or lower scores than expected.
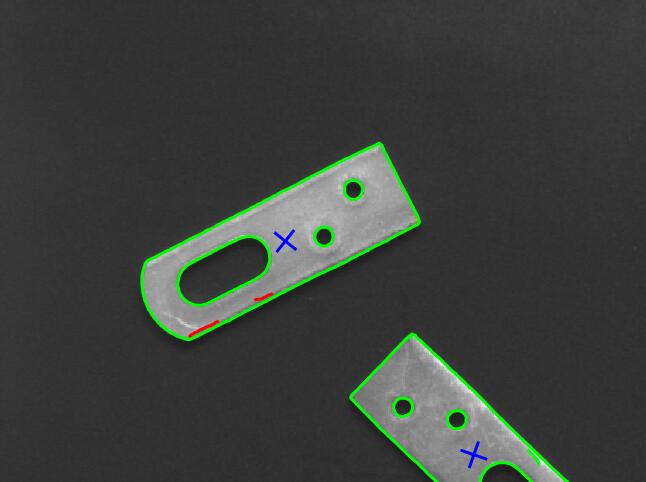
For every found match, a score contribution value is calculated for each model point. While the 'score' of a match represents how well the model matches the object instance as a whole, contribution values are an indicator of how well the individual model points represent their respective object part.
See the description of 'score_visualization_contours' in get_generic_shape_model_result_object for details on what is considered in the calculation of these values.
You can use get_generic_shape_model_result_object to retrieve model contour parts for different
score contribution ranges. The example program %HALCONEXAMPLES%\hdevelop\Matching\Shape-Based\get_generic_shape_model_result_score_visualization_contours.hdev shows how to extract and visually present the contours for further investigation.
 |
 |
|---|---|
Some parts of the model contours have significantly lower score contribution values (red) than the rest (green), which suggests that the red parts are not reliable representations and should be removed from the model
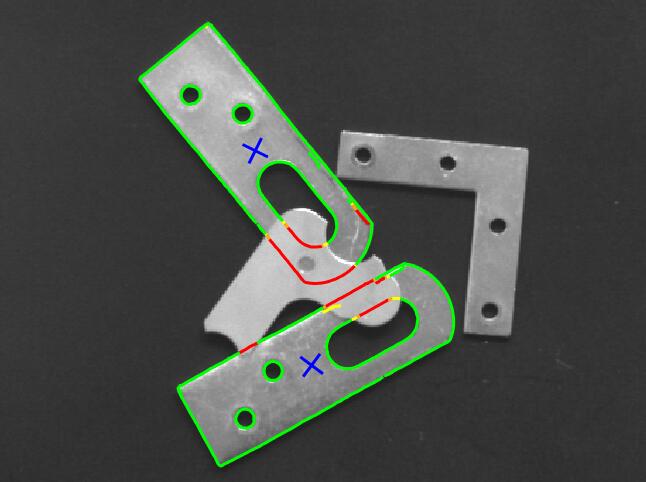
Some instances result in lower matching scores, as partial occlusion decreases the score contribution of some model parts (red, orange, and yellow parts).
Choosing reasonable intervals for the selection of score visualization contours depends on your task.
For instance, using 'min_score' as a threshold shows which points of the model helped the score of each match to exceed 'min_score' (green and yellow contours in
and
) and which model points are not resembling the object enough to reach 'min_score' (orange and red contours).
Score contribution values can also be negative when the shape model’s 'metric' is set to 'use_polarity' or 'ignore_global_polarity'.
However, in all cases, a higher score contribution value indicates a better match between the model point and the object instance.
Using multiple shape-based matching results🔗
Dealing with multiple matches🔗
If multiple instances of the object are searched and found, the handle MatchResultID contains multiple entries.
They are accessible by get_generic_shape_model_result and get_generic_shape_model_result_object, respectively.
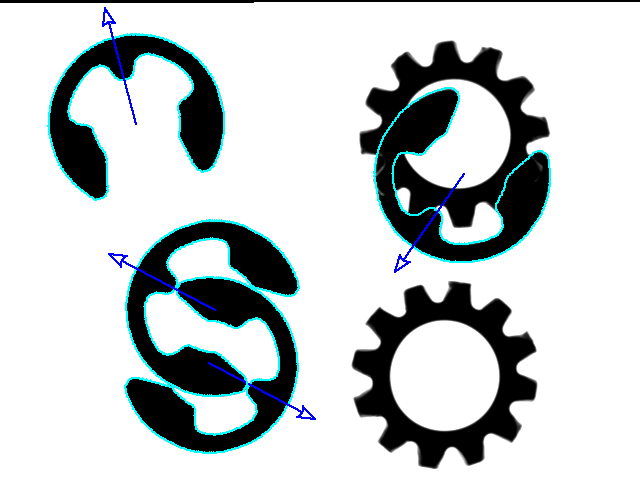
Note, in this example we access the results one by one in order to illustrate how you can retrieve further characteristics of every found instance as, for example, the transformation matrix and the position of the instance.
But we could also have accessed them all at once using a different match selector, see get_generic_shape_model_result.
find_generic_shape_model (SearchImage, ModelID, MatchResultID, NumMatchResult)
for j := 0 to NumMatchResult - 1 by 1
    get_generic_shape_model_result_object (Objects, MatchResultID, j, 'contours')
    get_generic_shape_model_result (MatchResultID, j, 'hom_mat_2d', HomMat2D)
    get_generic_shape_model_result (MatchResultID, j, 'row', Row)
    get_generic_shape_model_result (MatchResultID, j, 'column', Column)
    affine_trans_pixel (HomMat2D, -120, 0, RowArrowHead, ColumnArrowHead)
    disp_arrow (WindowHandle, Row, Column, RowArrowHead, ColumnArrowHead, 2)
endfor
affine_trans_pixel with the transformation matrix resulting from the instance.
Important
If you want to transform the matches yourself, you must use affine_trans_pixel and not affine_trans_point_2d.
Dealing with multiple models🔗
When searching for multiple models simultaneously it is useful to store the information about the models, that is, the XLD models, in tuples.
The following example code stems from the already partly described example program %HALCONEXAMPLES%\solution_guide\matching\multiple_models.hdev, which uses the operator find_generic_shape_model to search simultaneously for the rings and nuts depicted in Figure 2.
You can access the found instances of the different models directly. In this example we access them one by one to retrieve also the respective model identifier.
find_generic_shape_model (SearchImageReduced, ModelIDs, MatchResultID, NumMatchResult)
for i := 0 to NumMatchResult - 1 by 1
    get_generic_shape_model_result (MatchResultID, i, 'model_identifier', Model)
    get_generic_shape_model_result_object (Objects, MatchResultID, i, 'contours')
    dev_display (Objects)
endfor
Adapting to a changed camera orientation🔗
HALCON’s shape-based matching allows to localize objects even if their position and orientation in the image or their scale changes. However, the shape-based matching fails if the camera observes the scene under an oblique angle, that is, if it is not pointed perpendicularly at the plane in which the objects move, because an object then appears distorted due to perspective projection. Even worse, the distortion changes with the position and orientation of the object.
In such a case you can on the one hand rectify images before applying the matching.
This is a three-step process:
First, you must calibrate the camera, that is, determine its position and orientation and other parameters, using the
operator calibrate_cameras.
Secondly, the calibration data is used to create a mapping function via the operator gen_image_to_world_plane_map, which is then applied to images with the operator map_image.
On the other hand, you can also use the uncalibrated perspective deformable matching. It works similar to the shape-based matching but already considers perspective deformations of the model and returns a projective transformation matrix (2D homography) instead of a 2D pose consisting of a position and an orientation. Additionally, a calibrated perspective deformable matching is provided for which a camera calibration has to be applied and which results in the 3D pose of the object.
Note that if the same perspective view is used for all images, rectifying the images before applying the matching is faster and more accurate than using the perspective deformable matching. But if different perspective views are needed, you must use the perspective matching.